Posts tagged: science projects

Hot - Edible Sugar Science (Weekly Unplugged Project)

comments Comments Off
By Mom Unplugged, August 11, 2008 7:19 pm

Finally, here is my hot post that disappeared into the ether last night. Thanks so much to Julie K in Taiwan, Angi and Nature Mama for having the brilliant idea of emailing me the post from their Google Readers. That saved me at least an hour of rewriting! I was so down on computers this morning, but this evening I am uplifted by the fact that three people I have never met in “real life” can help me out! Thank you!!! Now, on to the post:

++++++++++++

The theme for this week’s Unplugged Project was hot. Finally, we managed to get back on schedule and do it, although we broke away from our usual craft project and went in a more scientific direction.

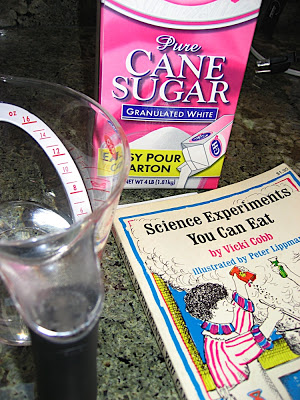
While away this summer, I found a number of good books in my Dad’s favorite thrift store (he’s a packrat too). One is called Science Experiments You Can Eat by Vicki Cobb (more about the book at the end of this post). While we were trying to come up with hot ideas, my 7 year-old daughter picked up this book and wanted to choose a food-related project. We decided on Caramel Syrup: Sugar Decomposes from the Kitchen Chemistry chapter.

Older children will find this scientifically interesting and fun to do. Younger kids will enjoy the end result!

The goal of the experiment is to teach about chemical compounds and how they can sometimes be broken down into completely different substances. Although I always liked science in school, I am not a chemist so forgive me if I am not 100% perfect in my description.

Since I am a terminal nerd, I didn’t trust the book’s very simple explanation, and actually researched sugar and how it decomposes. I learned that sugar and its breakdown process is rather complicated. (If the mysteries of caramelization keep you awake at night, then read this.)

I tried to keep it 7 year-old simple and explained to my daughter that sugar is actually carbon and water fused together. When you heat sugar, it breaks down into its original carbon and water elements. I showed her the scientific formula for table sugar (sucrose): C12H22O11 . She already new that H2O was water and could see that in the formula. After I explained that C meant carbon, she saw the carbon and water in the formula.

Heating the sugar would cause it to become watery (the release of the water) and dark (the carbon). It would no longer really be sugar.

What we needed - sugar, water, a heavy frying pan:

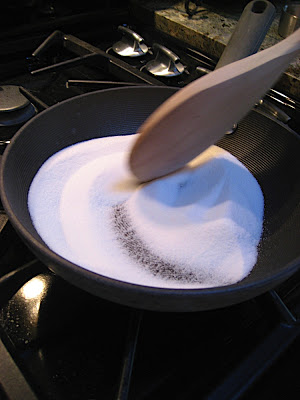
First my daughter poured half a cup of sugar into the frying pan:

We heated the sugar over medium-high heat and my daughter stirred it:

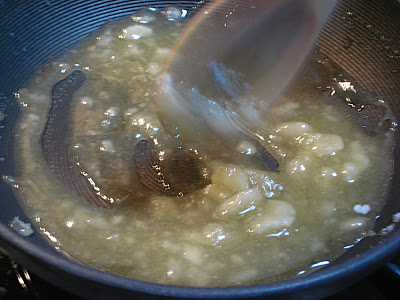
After about 5 to 10 minutes, the sugar started to melt:

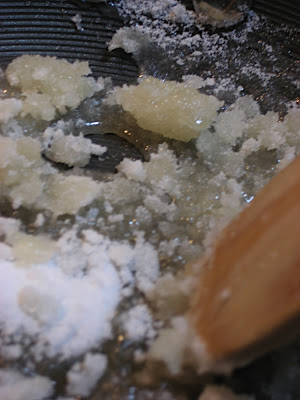
As my daughter continued stirring, the sugar melted further and began to darken and become very watery:

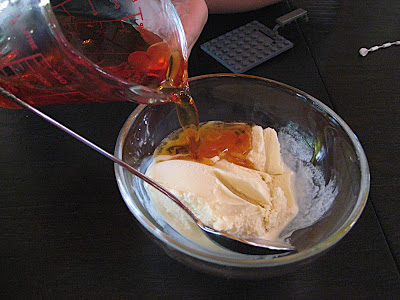
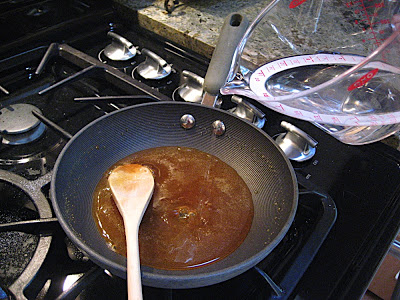
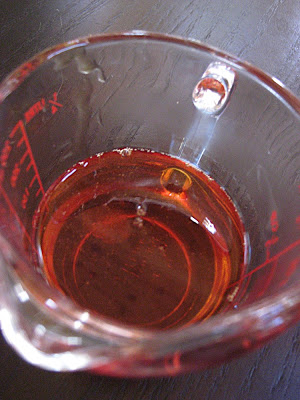
Finally it turned “straw-colored” and we had transformed our sugar into a new substance - caramel. We turned off the heat and slowly added half a cup of water in order to create a runny, edible solution. I did the pouring as the caramel was so hot that it steamed and spattered:

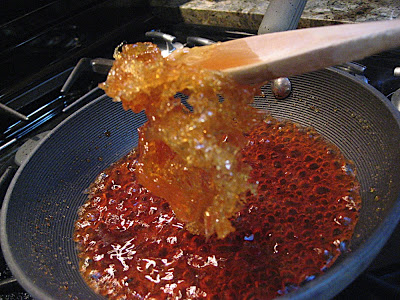
The shock-cooled caramel formed a brittle sort of candy-lump that we just had to taste:

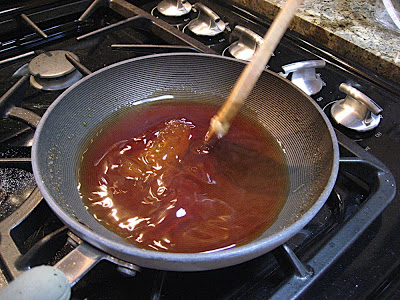
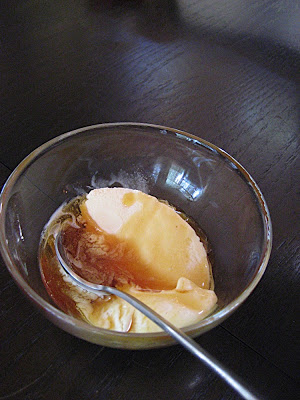
My daughter continued stirring the mixture on low heat for about another ten minutes - until the big caramel chunk dissolved into a solution:

This is what we ended up with: a delicious carbon-water mixture that we ate over ice cream!

++++++++++++

If you haven’t heard of Science Experiments You Can Eat and you have scientifically-inclined children (or you homeschool), you might want to check it out of the library. Ours is an old version (1972), but the new one is supposedly revised and updated. I haven’t seen the new one, but our book has the following chapters about the science of food: A Kitchen Laboratory; Solutions; Suspensions, Colloids, and Emulsions; Carbohydrates and Fats; Proteins; Kitchen Chemistry; Plants We Eat; Microbes; and Enzymes.

+++++++++++++

If you did this week’s hot Unplugged Project, please put your link in Mr. Linky below so we can all find you. If you didn’t, please read how to join in, and consider doing next week’s project.

+++++++++++++

Next week’s Unplugged Project theme will be:

Trees

Have fun!

Sky - Constellation Star Charts (Weekly Unplugged Project)

By Mom Unplugged, July 6, 2008 9:02 pm

For this week’s Unplugged Project, sky, I was inspired by my Uncle’s very detailed star charts. He used to create charts of the constellations using thick black paper, a white pencil, and a pin to put holes where the stars were. The bigger the pinhole, the brighter the star. When you hold his charts up to the light, they are a very accurate representation of the night sky. I tried to photograph one of his charts here, but they are much easier to appreciate in person:

We gathered together astronomy books, construction paper (although dark blue was the closest we had to black), colored pencils, a ruler, and pins:

First we studied the books to find constellations that we liked. My oldest chose Leo since that is her “sign.” My 3 year-old nephew made up his own constellation, as you shall see.

Then we cut some dark blue construction paper in half. We transferred the dots to the paper as best we could by eye (if you have a simple constellation book with large drawings such as H.A. Rey’s excellent classic: The Stars: A New Way to See Them , it might be easier to trace them on tracing paper and then transfer them over to the construction paper).

The younger astronomers just drew a bunch of dots or “stars” randomly on their paper, as my 2 year-old is doing here:

They then drew lines between the stars, connecting the dots, to show the constellation forms as they do in books:

The really fun part was poking holes through each star (dot) with a pin so the light would shine through. We were not as accurate as my Uncle and did not worry about star intensities!

My 3 year-old nephew decided that his constellation was a sea horse and I can really see that! Here are the finished star charts:

And when held up to a window or light, they look like this:

++++++++++

If you joined us for sky this week, please put your link in Mr. Linky and leave a comment so we can find you. If you didn’t, you can read about how to join here.

++++++++++

The theme for next week’s Unplugged Project will be:

Stone

I hope to see you then!

Birds - Nice Nests (Weekly Unplugged Project)

By Mom Unplugged, April 27, 2008 9:10 pm

My two oldest each had lengthy birthday parties to attend this afternoon. So although I had an art project in mind when I chose birds as this week’s Unplugged Project theme, my children’s busy social calendars precluded anything too complicated.

Instead of art this week, we decided to do something I was meaning to do anyhow: put out some nice spring nesting materials.

While most people know that putting out food and water for wild birds is a great way to attract them to your yard, another often overlooked additional method is to provide nesting materials in the spring. As long as you have some good nesting locations (requirements vary by type of bird), giving them handy materials can encourage them to nest in your yard where you can watch the action for several months.

All you’ll need are some empty suet feeder cages, or a few of those nets used to package oranges or potatoes in bulk. We used a big net from some oranges and a few small Baby Bel cheese nets.

We have some high class, five star nesting material: leftover alpaca fleece from Dempsey, an alpaca at our local alpaca ranch!

If you don’t happen to have a local alpaca ranch or any spare alpaca fleece lying around your house, you can also try putting out any of the following:

-dried leaves and twigs
-human or horse hair
-pet fur, sheep’s wool
-dry grass
-plant fluff (ie. cattail fluff)
-feathers
-yarn or string (cut into 4″ to 8″ pieces)
-thin strips of cloth (1″ x 6″)
-cotton batting
-bark strips
-pine needles
-shredded paper
-moss

But don’t put out drier lint (stays soggy, dries hard, can contain chemicals from laundering).

You can prepare the household materials together, or go on a nature hike to collect suitable natural materials.

Place the materials in the nets or cages and hang them around your garden on trees, or deck railings. You can also push loose material into tree crevices or between rocks, and drape yarn and string over bushes. Heavier items that won’t blow away, like twigs, can be put out in small piles around your yard.

Then simply sit back and watch to see if there is any interest in your spring gifts!

For more about this (and my source for much of this information), please see: Attracting Birds With Nesting Material from the fascinating Cornell Lab of Ornithology website.

++++++++++++++++++++++

If you participated in the birds project this week, please put your link in Mr. Linky below (also be sure to leave a comment in case Mr. Linky malfunctions).

++++++++++++++++++++++

Next week’s Unplugged Project theme will be:

Green

Please join us!

++++++++++++++++++++++

Help Support Wildlife - Certify Your Yard!

By Mom Unplugged, September 21, 2007 6:46 pm

I have written several posts about how to certify your yard as a Backyard Wildlife Habitat with the National Wildlife Federation (NWF):

Project: Make Your Yard a Certified Wildlife Habitat (July 5, 2007)

Backyard Wildlife Habitat: Great Nature Slideshow (July 14, 2007)

Another Backyard Wildlife Slideshow (July 20, 2007)

The other day I just got an NWF email saying that they have almost reached their goal of certifying 100,000 habitats. The NWF needs to certify only 5,000 more yards to get there!

If you have been thinking about doing it (or even if the whole concept is new to you), now is the time. You don’t have to have a grand estate. All you need are the four basic habitat elements: food, water, cover, and places to raise young.

Once you go through the easy online process to certify, you will be eligible to buy the cool sign like ours in the photo. That way, neighbors and passers-by will know that you care enough about wildlife to provide a sustainable habitat in your own yard. You’ll also help spread the word to others about the existence of this great program.

Having your kids help you certify your yard is a wonderful way to teach them about the needs of wildlife. Two Unplug Your Kids readers even created online nature slideshows of their habitats. You can view them by clicking these links: Meeyauw’s slide show and Tiffany’s slide show (Nature Mom). If you feel like making your own slideshow, please let me know and I would love to link to it.

So, click here to get started today!

Mom Unplugged vs. Evil Sleepy Poser Mom - Lunar Dilemma, Part 2

By Mom Unplugged, August 28, 2007 9:00 pm

NOTE: This post will make more sense if you first read part 1: The Moon Unplugged? Not For Me!!

I know that “my public” is in complete suspense about the outcome of my lunar eclipse dilemma, so I will put the two of you out of your collective misery and tell you who won. Was the victor Mom Unplugged or the Evil Sleepy Mom?

The answer is: guilt prevailed and I think I deserve a genuine Good Mom Award for this one!!

I set my alarm for 2:30 AM so as to not be the complete loser I knew I would be by certainly sleeping through the entire eclipse. Unfortunately the moon was not conveniently eclipsing directly over the skylights above my bed. And…horror of horrors…I could actually see STARS, many, many stars. Not a single cloud in the sky. There went my bad weather excuse.

I decided to drag myself out of bed to try and find the moon. I was also worried that the three new kittens on their first night completely loose in the house, might have become terminally ensnared in the hanging beads of their favorite lampshade. Despite having moved that particular floor lamp away from any easy launching pads, I quite expected to come downstairs to find all three kittens, each dangling from the lampshade by a single claw.

Perhaps all was not lost in the sleep department either. Maybe the moon was putting on its special show directly over the living room skylight that is above the sofa. I had visions of continuing my sleep on the sofa while my junior astronomer studied the eclipse beside me. Or better yet, parking my daughter on the sofa with some binoculars and then going back to bed!

Well, there were no Cirque du Soleil kittens suspended from lampshades, and I did see the moon through a living room skylight, but unfortunately not the one over the sofa.

Despite having witnessed several other lunar eclipses in my life, I was still awestruck. For a homework assignment over the weekend, my daughter had just observed that the moon was pretty much full, yet here it was suddenly looking more like a crescent. I decided that I had better be a Good Mom after all and wake her up.

But first I wanted to find the binoculars that I hadn’t seen for three years. As I wandered around the house in search of them, first one kitten, then another, attached itself to my pajama pant legs. There I was, searching the house for a pair of fatally missing binoculars at 2:40 AM with a kitten dangling from each leg of my pajamas, swinging to and fro as I walked.

“OK, enough is enough!” I thought, as I gave up on the binoculars, detached the kittens, and went to wake my daughter. I hopefully thought that my little girl might be a less enthusiastic scientist at this hour, but she eagerly leapt out of bed.

“WOW!” she said as she saw the partially eclipsed moon. We talked about the science of it all as we watched, first from the living room, then from the back deck. Just as it was about to totally eclipse, it occurred to me that we might as well do this up right so I grabbed a flashlight and warm jackets and led us through the backyard and out onto the golf course directly behind our house.

We laid down side by side on the cold, damp grass and there, finally free of the tall Ponderosa Pines that fill our yard, we beheld quite a spectacle. The starry sky formed a perfect dome above us. The now orange-red totally eclipsed moon was, of course, the main attraction. But we had plenty of other celestial wonders to discover alone together, recumbent in our pajamas at 3AM in the middle of the 10th fairway.

We identified the milky way and several constellations. We also saw shooting stars, a first for my daughter. Most were the rapidly fleeting kind, but one was a big slow-moving object that seemed to trail a long tail across the sky before finally evaporating.

I must admit that as we lay there, I was wondering about the schedule of the sprinklers and half expected our lovely time to be rudely interrupted by a sudden dousing of cold water. But we escaped them. Although a bit later, finally back in my warm bed, I did hear the sputterings and squirtings of them turning on. We had a narrow escape!

As we meandered back to bed at about 3:30 AM, my daughter told me that she would dream she was riding between Mars and Earth on a shooting star, sitting astride it and holding on to the top point.

I must say I really did feel like a “real” Mom of the Year as I, slightly damp but happy, tucked her back in bed and kissed her goodnight. Thank you Mr. N (her teacher) for encouraging us to break our routine and gaze at the moon in the middle of the night.

Blog Widget by LinkWithin

Help Pakistan

Panorama Theme by Themocracy