Posts tagged: string/yarn

Geometric - String Pattern Art (Weekly Unplugged Project)

By , August 30, 2009 9:55 pm

The theme for this week’s Unplugged Project was geometric.

Inspired by this article from Family Fun we made geometric string patterns. However, not being able to resist changing instructions, we did it a little bit differently.

The article uses painted wood panels and nails. While this would certainly produce a sturdier and probably more striking result, I didn’t want to mess with sawing and painting, so I came up with a simpler alternative: foam board and straight pins.

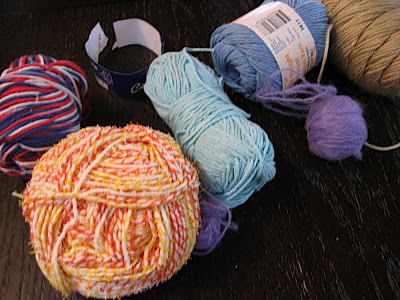
You’ll need foam board, colored yarn, scissors, and pins.

Cut the foam board into a 12 inch square. The edges were messy so I bound them with red duct tape which actually made a nice frame.

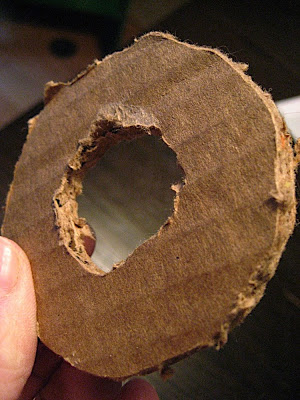
Trace around a dinner plate onto a piece of paper to get a perfect circle. Cut out the circle. This will be your pattern for placing the pins.

Fold the paper circle in half four times and unfold. You should have 16 evenly spaced creases. Lightly tape the circle to the center of the foam board.

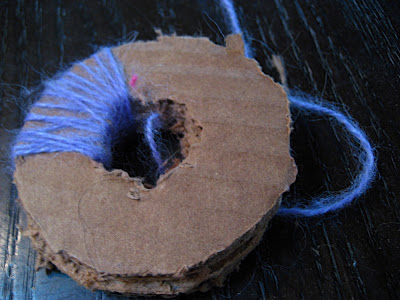
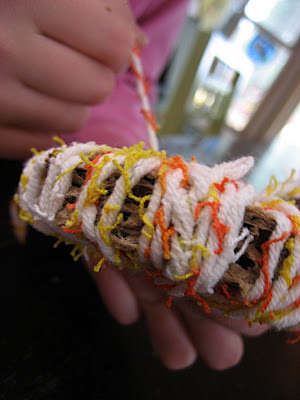
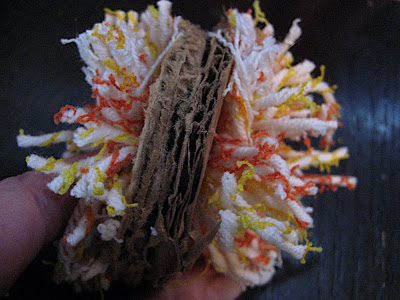
Stick a pin in at the top of each crease touching the edge of the circle. The pins will be sticking out pretty far, but that will give you lots of room to wrap the yarn. (NOTE: We experimented with cutting the pins in half to make them shorter, but they kept falling out and didn’t leave enough room for multiple strands of yarn.)

Remove your paper pattern and choose your yarn.

Tie the end of the yarn onto the top pin (the “12 o’clock pin”, let’s call it number 1). Create a repeating pattern and wrap your yarn. For example, moving clockwise, skip two pins and wrap around number 4, then go back to the next pin over from the “12 o’clock pin” (number 2) and wrap, moving clockwise, skip two more pins and wrap, etc. This pattern would be: 1, 4, 2, 5, 3, 6, 4, 7, etc. (NOTE: Pattern in the photo below is different, don’t get confused!)

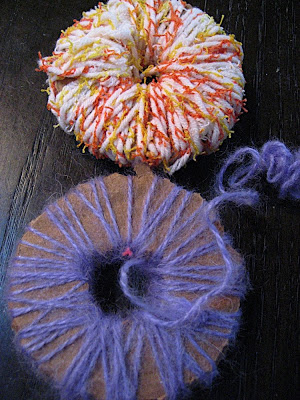
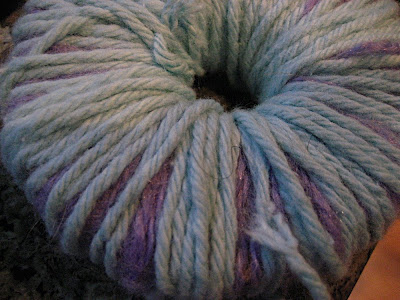
Work all the way around the circle. When you are finished you should have a nice design. Cut the yarn and tie the end onto the last pin (should be the 12 o’clock pin).

Tie a new color onto the 12 o’clock pin and proceed with a different pattern. Any pattern at all is fine as long as it repeats itself all the way around the circle of pins. We found that three different patterns were all the pins would hold comfortably.

The article suggests putting a dab of glue on the knots. We didn’t bother, but probably would have if we had gone all out and done the wood and nails method.

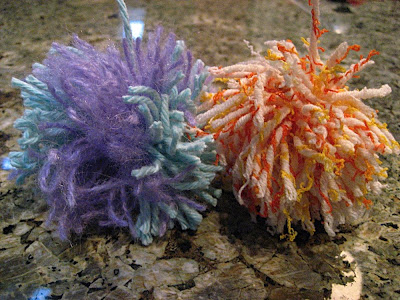
My 9 year-old daughter loved this so much that she made two other little ones in the corners of her board:

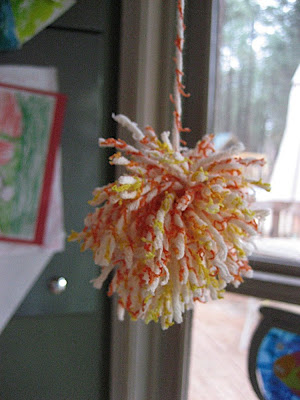
My 3 and a half year-old enjoyed it too. I gave her a small piece of foam board, stuck pins in for her, and told her to do whatever she wanted.

This was the result:

She was very proud and couldn’t wait for me to take a photo!

USEFUL TIP: Remove all cats from the room. Much to everyone’s aggravation, Pita The Adventure Cat enjoyed this project tremendously:

OTHER IDEAS: You don’t have to use a circle. Try triangles, squares or rectangles. Try different numbers of pins. If you really want to get fancy, you can even make these in three dimensions!

LINKS:

++++++++++

As always, if you did a geometric Unplugged Project, then please leave the link to your actual post below. If you didn’t do a geometric project, then please do not link. You can read more about how to join in here. We’d love to have more participants!

++++++++++

The theme for next week’s Unplugged Project will be:

Ocean

Have fun and please join us!

++++++++++

Fluffy - Pom Poms for Peace (Weekly Unplugged Project)

By , December 7, 2008 8:35 pm

This week’s Unplugged Project theme (fluffy) was not premeditated, it just popped into my head.

I wanted an adventure this week so I thought long and hard all week about what to do. Cotton balls? Ordinary. Dryer lint? Flammable. Pom poms? What does one do with pom poms besides add some googly eyes? Not in the mood.

But then I found this: Pom Pom International!

Amy Lamé has a vision. She is trying to bring people of the world together. But how? With music? No. Art? No. What then? Pom poms!! What could be less politically charged and more fun and appealing to humans everywhere, than the humble pom pom! As Amy puts it:

Dealing with differences is much easier with a stress-busting pompom in your hand.

This is what it is all about:

Pom Pom International travels to areas of conflict around the globe. Together, we create whimsical,
non-political, creative balls of fluffy yarn in a gesture of peace and reconciliation. All pom poms are tagged, tracked and sewn together to make the biggest pom pom in the world.

Why not? I love this idea!! A peace pom pom!

If you can’t make it to a live pom pom making event, then you can create your pom pom at home and send it to Amy. Email her a photo of you and your pom pom and she’ll add it to her online gallery.

I remember my mother teaching me how to make pom poms and I have a distinct fondness for them, so I was quite excited to make pom poms for a higher purpose than merely a place to stick googly eyes.

Pom poms are surprisingly easy and fun to make. All you need is some sturdy cardboard (corrugated is best) and leftover yarn:

Cut two matching circles out of the cardboard. Next cut matching circles out of the middle of the original circles so you have a doughnut shape. (NOTE: Our cardboard was from an extra heavy box so I ended up using a dremel tool to cut these, but you really don’t need cardboard that is quite that tough!):

The width of the “ring” portion of your doughnut (distance between outer edge and start of inner hole) will determine the size of your pom pom (bigger band=bigger pom pom). Also, I would advise making your donuts a bit bigger than we did so that the middle hole can be bigger. A larger hole makes it easier to pass the yarn through.

Place your cardboard rings together like a sandwich.

Choose your yarn and cut a length that is several yards/meters long. Roll it into a small ball so that it can easily pass through the center hole. Pass the loose end of the yarn through the hole and hold on to it with your thumb. Wrap yarn tightly around the doughnut like this (once you start wrapping, you can let go of the loose end):

Keep wrapping all around the circle as many times as necessary to completely cover it. Keep going until you can no longer fit any yarn through the hole … or you run out of patience, whichever comes first! The more yarn you use, the thicker and puffier your pom pom will be.

When you finish your first small ball, you can easily add on more yarn by simply threading the loose end through and holding it with your thumb, just as you did before. You can change colors this way too, as I did with my blue and purple pom pom.

When you are through wrapping, cut the strands all the way around the edge of the doughnut with the scissor tips between the two cardboard pieces.

Now wrap a long strand of yarn around the pom pom, between the two sandwiched sections and tie tightly:

And finally, the really exciting part: gently pull apart the two cardboard rings to reveal your completed pom pom. Trim and fluff as necessary, and there you have it! A nice, fluffy, pom pom for peace!

In order to have your pom pom be a part of the giant peace pom pom simply print out a tag for each pom pom from the Pom Pom International website, take a photo of you and your creation for the website’s gallery (send it via email), then ship your tagged pom poms to Pom Pom International in London, England! Full instructions, tag and addresses are here.

Tomorrow after school we will be off to the post office to send our peace pom poms to England. The children are very excited!

++++++++

LINKS:

Amy’s explanation and diagram of making a pom pom - very helpful!

Pom Pom International

Pompoms Can Save the Planet - May 6, 2008, The Scotsman Newspaper

By the way, Amy also gratefully accepts donations of any leftover or recycled yarn balls and bits. Send all “orphaned or previously loved yarn” here:

NEW Pom Pom International HQ
106 Lower Marsh
London SE1 7AB
ENGLAND

It will be used for the free pom pom making events.

If you are feeling really enthusiastic, she also seeks Pom Pom International Ambassadors. Can you volunteer to organize a pom pom making booth at a crafts or art fair? How about a club event? The more pom poms, the better.

++++++++

Did you do a fluffy Unplugged Project this week? If so, then please post a link to your project post (not just your blog) in Mr. Linky below. If you didn’t participate but would like to learn more, then please do not link, but read about it here.

++++++++

The theme for next week’s Unplugged Project will be:

Curly

Have fun!

++++++++

Metal - Tin Can Knitter (Weekly Unplugged Project)

By , May 25, 2008 8:09 pm

Above you can see the product of this week’s Unplugged Project theme of metal: a knitted hamster.

I know what you’re thinking: “Wait a minute, the theme was metal, why is she showing us a knitted hamster?” Well, my point here is to prove just how flexible the Unplugged Project can be.

This is not just any old knitted hamster, it is a hamster that was knitted on a homemade tin can knitter. A tin can is made of metal. Voilà! There is the connection! Our finished product was made of yarn, but it was made by using something metal, so it “counts.”

This type of knitting apparatus is known as a French Knitter, a Corker, a Spool Knitter, a Mushroom Knitter, a Knitting Nancy, a Knitting Knobby, and a few other names too I believe. My daughter has a commercially produced wooden one like this with four prongs that produces long, narrow, “snakes.” But you can easily make these knitters yourself (see links at the end of this post).

For even more fun, you can make big ones with various sizes of tin can which will produce different sizes of knitted tube. Ours is made from a 15 ounce can.

I found the instructions for the knitter and the hamster in the wonderful book Corking (Kids Can Easy Crafts) by Judy Sadler and Linda Hendry. There are also some instructions online here.

+++++++++++++++++++

Here is how we made it:

You will need a clean tin can, some finishing nails (small heads) that are about 1.5″ long, and some sturdy tape. Small nail heads are important because the knitting process involves slipping loops of yarn up over the top of the nails, so you don’t want the yarn to get stuck on the nail heads. The book calls for cloth tape, but all I could find was colorful duct tape and that worked fine despite being a bit annoying to cut (I recommend slicing it with a box cutter instead of using scissors, which tend to stick):

First we removed the bottom of the can. You can usually do it with a can opener, but sometimes the bottom edge is rounded and must be removed with a dremel tool, or small saw. My advice: make sure you use a can whose bottom rim is narrow enough to be removed with a can opener.

Beware of sharp edges. I had a sharp shard that was sticking out on my can, so I squashed it down with some pliers, and then wrapped both raw edges with the tape.

Next apply a strip of tape just under the lip of the can sticky side out. Stick a pair of nails side by side (they should be touching) to the tape. Make sure to have about half an inch of the nail sticking up above the can edge and the other inch below. In order to knit, the nails must be stable so you’ll want a lot of the nail to be attached to the can:

Put another pair of nails on opposite the first. Continue putting on sets of nails around the can. It doesn’t have to be scientifically precise, but try and space them about 5/8th” (1.5cm) apart. After all the nails are stuck to the can, wrap a few strips of tape all the way around the diameter of the can to hold the nails in place.

Press the tape down between each pair of nails. Next cut short strips of tape and apply them to the can between the pairs of nails like this:

Wrap more tape around the diameter of the can. I did two layers of tape, and finished off with more little strips between the nails for added stability and to cover up any raw sticky edges. You can either leave your can like that, or decorate it with glued on paper, fabric , or ribbon. We glued some fabric on and this is what we ended up with:

You can experiment with different sized cans which will produce different sized knitted tubes. If you use a jumbo, restaurant-sized can, you can even make an infant hat!

This was so much fun that after my daughter finishes her own hamster (which is well underway), I think I will steal the knitter back and make some nice, cozy socks for my two year-old. The tube that comes off this sized can looks to be just about the right size for her feet!

So that is it for the metal part of our post. If you want to know how to make the hamster, then you should buy Corking, or borrow it from the library.

LINKS:

Make a Sculpey Clay Spool Knitter

Make a Spool knitter out of a wooden thread spool

Spool Knitting (instructions on how to make a knitter, and how to knit)

++++++++++++++++++++++++

What did your family make for the theme metal? If you did a metal Unplugged Project this week, then please leave your link in Mr. Linky (and a comment in case Mr. Linky malfunctions and I have to remove him).

If you didn’t join us, then feel free to explore everyone’s projects to get inspired, and please consider joining us next week. You don’t have to do anything fancy or complicated! For more information on the Unplugged Project as well as instructions about how to participate even if you don’t have a blog, read more here.

++++++++++++++++++++++++

Next week’s Unplugged Project theme will be:

Paint

So far we’ve done quite a few Unplugged Projects that used paint, but I don’t think that it has ever been the theme before. Hope to see you here next week!

++++++++++++++++++++++++


String/Yarn - French Knitting (Weekly Unplugged Project)

By , December 16, 2007 10:31 pm

This week has been crazy for us with a school play, some gifts to make, my 7 year-old daughter’s book project (in addition to other homework), trying to peddle a few Christmas ornaments for Heifer International, etc., etc., etc. So our Unplugged Project fell a bit by the wayside, as did many of yours in this busy season I am sure!

So as to not appear totally lame (after all, the Weekly Unplugged Project is my idea so I can’t very well opt out can I?), I will post a String/Yarn themed project that my daughter has been continuously working on.

My 7 year-old daughter received a wooden “knitting mushroom” from Santa last year and really enjoys it. In case you are wondering about age-appropriateness, my daughter could manage all the knitting herself at age 6, although she needed my help to cast-on and off.

I recently reviewed a very nice one from Haba. The “knitting mushroom” creates a very simple, tubular, snake-like knitted strand that can be crafted into various objects, or simply knitted for the pleasure of knitting as ours have been so far, despite owning the inspirational book in the photo: Corking (Kids Can Easy Crafts). Ah well, we’ll get to it eventually.

My thoughts for this week had been: gluing yarn to construction paper to make designs or pictures with my 5 year-old, or trying finger knitting with my oldest. That will all have to be for another time however.

Next week I will be out of the country and most likely computer-less (AAAGHHHH!!! HELP!!!!!), so the following Unplugged Project will be due two-weeks from now - Monday, December 31st (New Year’s Eve? Time sure does go by fast!).

+++++++++++++++++++++++++++++++++++++++++++++++++++++++++

New Year’s Unplugged Project:

Collage

Perhaps a collage of fun things remembered from the past year?

Or things that would be fun for the coming year?

Or, for children old enough to understand the concept of “New Year’s Resolutions,” a collage of pictures relating to their resolutions.

Or…a white collage for little ones…white like the winter snow of January.

Or…anything you want to do!

Have fun! I hope anyone who reads this and is interested, will join in and meet back here on Monday, December 31st to share posts. Happy Holidays!

Blog Widget by LinkWithin

Fight World Hunger

Panorama Theme by Themocracy