Category: nature

Flip a Rock on September 20th

By , September 8, 2009 1:18 pm

As I am sure you all know, September 20th, 2009 is the 3rd Annual International Rock Flipping Day.

Oh, you didn’t know that? Well, on September 20th take your kids outside, choose a rock to flip, then:

1) Record what you find. “Any and all forms of documentation are welcome: still photos, video, sketches, prose, or poetry.”

2) Replace the rock as you found it; it’s someone’s home. But if there are critters underneath, move them to the side before you replace the rock and let them scurry back. You don’t want to squash anyone.

3) Post on your blog, or load your photos to the International Rock Flipping Day Flickr group.

4) Send a link to Susannah at Wanderin’ Weeta. Her e-mail address is in her profile.

5) Susannah will collect the links, e-mail participants the list, and post it for any and all to copy to their own blogs.

6) She also says: “Maybe we can Tweet it, too, this year. Use the hashtag #rockflip.” (NOTE FROM ME: This information is totally beyond my comprehension, but if you understand Tweeting, then give it a go that way and I will be impressed.)

(All instructions are from Wanderin’ Weeta’s blog - edited slightly by me)

I love this idea because it reminds me of something I did in very early elementary school (Kindergarten? 1st Grade?). We went out and measured a one foot by one foot square of dirt behind the school, and then we had to look closely and draw what we saw in that square. Obviously it made an impression since I remember that lesson VERY many years later!

So go ahead, take the badge, the link, and the instructions, and pass it on.

It’ll be fun and interesting, so please join in! We’ll be there! (…and September 20th is even my sister’s birthday…)

NOTE: More on the history of Rock Flipping Day at Wanderin’ Weeta’s.

Harvesting the Worm Bin

By , August 28, 2009 2:09 pm

About 8 weeks after we began our first attempt at vermicomposting (worm composting) it’s already time for our first harvest!

  • How did I know? The contents of the bin were rich black castings and the newspaper bedding was almost completely decomposed. Also, the worms were starting to climb the sides of the bin, clearly no longer satisfied with their accommodations.
  • Preparation: Always feeling that I can improve on any instructions (a major character flaw I am afraid), I did not follow my original harvest plan. Instead I pushed all the bin contents over to one side, and set up a new area on the other side with damp brown paper shreds and food. I left the bin this way for about a week hoping that the worms would mostly migrate to the fresh, new side.
  • Harvest Day: This is what the bin looked like when I opened it this morning. See the two sections? Old on the left - ready to go in the garden - and new on the right:

You’ll need newspaper, tub of water, and a bucket for the castings:

(Note: Cats are not a required item, although they felt they were.)

First I tore newspaper into 1 inch strips and tossed them in my tub of water to soak.

Next I began digging out some of the castings from the left side and I noticed that most of the worms had indeed migrated to the fresh section. It was mostly worm free until I got close to the border, then I had some sorting to do.

NOTE: I don’t mind worms, so I used my hands (the castings smell and feel rich and damp and clean, like the ground after a cool rain!). However, if you’d rather not handle the worms, you can try this method.

I spread each handful of castings on some newspaper and picked out the worms and any chunks of not quite composted newspaper or food. It was truly a glamorous job, but at least I felt fairly sure that most of my worms would end up back in the bin to keep up the good work. No garden vacations for my guys!

I returned the undigested material and any stray worms to the new side of the bin.

By the time I had finished, I had collected at least a gallon of gorgeous black worm compost:

and my bin looked like this:

  • Redecorating: Finally, I spread out what remained in the bin, squeezed out my newspaper strips (really well so as not to drown the worms) and tossed them on top. I added a bit of fresh sand for their gizzards and some food for their tummies, assuming worms have tummies. I placed a fresh piece of damp cardboard on top to help keep things moist (the voracious little devils had completely eaten through their last one!) and put on the lid.
  • The Garden: The hardest part of all this was deciding where to put my precious compost. I chose a climbing rose that I have had for about 4 years. It was the very first thing I planted when I moved into this house.

Much to my surprise, there was still plenty left over. I headed to my dismal back flower bed which grows ugly little stunted flowers due to poor soil, and gave it the rest. Will it all be 6 feet tall by tomorrow???

LINKS: How we made our worm bin (quite easy and inexpensive), and the arrival of the worms.

Worm Bin Update - NO VACANCY

By , June 24, 2009 10:12 pm

(WARNING: If you don’t like worms, then skip this post!)


It was a very thrilling day today - our 2 lb. bag of Red Wigglers finally arrived!!

The Fedex driver had probably never had a more excited welcome than he got this afternoon. As my 8 year-old daughter put it: “Now we have millions and millions of pets!!!” Hmmm….not exactly what we need with 9 cats, a dog, 2 birds, 2 fish and a bunch of happily reproducing sea monkeys.

Here is the box of our very well traveled worms. Did Fedex know what they had in here?

The worms arrived nicely packed in a brown paper bag.

We opened the bag…

… and this is what we saw:

After holding a few worm friends:

And discovering an egg:

We gently tipped them into our “Worm Hotel” and tossed some of the damp newspaper on top of them.

Next came food. We were certain that they were hungry after their very long trip, the sort of trip that most worms never have to make.

The menu consisted of a medley of carrot peels, followed by leftover bok choi greens and brown rice, with some tea leaves for dessert:

We hope that our new pets will be very happy and produce a great deal of lovely, rich poop castings to transform our nasty clay soil into gorgeous, moist, nutrient-filled humus.

NOTE: To see how we made our worm bin, please visit our “Slippery” Unplugged Project post.

UPDATE: Harvesting the worm bin (it took only 8 weeks to make a gallon of lovely compost).

++++++++++

Albatross Studies

By , January 30, 2009 8:38 pm

Perhaps my favorite place in the whole world is the South Island of New Zealand. If you live there, I SO envy you! What a beautiful place filled with nice people…I can’t say enough wonderful things about it. The only drawback is that, for most of us in the world, it is a little out of the way. No, make that VERY MUCH out of the way! Upon further thought however, perhaps that is what keeps it so lovely and friendly?

Anyhow, I was once fortunate enough to be able to visit New Zealand’s South Island. I believe it was in May and the leaves were turning color. There was a fall chill in the air…strange, since we had just left tree buds exploding with flowers and greenery emerging from the sun’s warmth - a promise of lazy summer days was near.

We had many remarkable adventures in southern New Zealand as we explored the glacial and fjord-laden, yet lush, west coast; viewed spectacular snowy mountainscapes of the central region; and enjoyed sheep (many, many, MANY sheep) grazing on peaceful green hills in the eastern portion.

One of the most interesting places that we visited was the Royal Albatross Centre in Dunedin. Before the visit, I really new very little about these amazing birds, except that according to old sailing lore, it was considered bad luck to see one. Wasn’t an albatross involved in Edgar Allan Poe‘s novel, The Narrative of Arthur Gordon Pym?

  • WEBCAM - I was quite excited to discover a live webcam from Dunedin’s Royal Albatross Center. I found this quite some time ago and have been meaning to write about it. At the moment, it seems to be showing just a general view of the colony since eggs are still incubating. However when there are chicks, it is a nest cam! Remember, that since it is live, you might find it is dark when you go to check it out due to the time difference. Keep going back, it is worth it.
  • TRACKING - There are quite a few sites out there that show tracking results for albatross that have been fitted with satellite trackers:

Seaturtle.org (2004 data)

2008 Black-Footed Albatross “race”: Check out these amazing results for “the 2008 winner” named Oski. In the 64 days (s)he was tracked, (s)he traveled a curved path totaling 19,571 km (a straight line distance of 4,943 km) at an average rate of 305 km/day!

The Hawaii Study: Has a good teaching/classroom component.

  • ADOPTION - If your family or class has the means (or wants to do a few fundraisers), you can even adopt your own albatross. The cost ($2,500 in 2008) covers the tracking tag and three months of data. You can choose the name of your bird and follow him/her in real time through online maps. Cool! The non-profit sponsor, Oikonos, will also send you a framed photo of your actual bird as well as a map of the completed three month journey.
  • TEACHING - Good classroom tools here.

Oikonos also offers free, downloadable classroom tools about the effects of trash and debris on marine birds.

The Albatross Project

If you do nothing else, watch (and show your kids) this gorgeous video of albatrosses soaring over the ocean, and “playing” in the wind. It is such a beautiful sight that it actually made me cry! Please watch it!

OK, now that you have been moved to tears by these beautiful birds, how about trying to save them? Here are some organizations that would like some help (fundraiser anyone?):

  • GIVING - Organizations that aim to protect the albatross from long-line fishing and ocean trash:

Oikonos

Save the Albatross

Birds Australia

I don’t homeschool, but if I did, I would somehow work in an albatross unit despite the fact that I live in Arizona! I hope that these resources will inspire somebody somewhere.

++++++++++

PHOTO CREDITS: Thank you Wikimedia Commons! For photo credits and licensing information, click on these links: Squabbling Albatrosses and Soaring Albatross.

++++++++++

Fluffy - Pom Poms for Peace (Weekly Unplugged Project)

By , December 7, 2008 8:35 pm

This week’s Unplugged Project theme (fluffy) was not premeditated, it just popped into my head.

I wanted an adventure this week so I thought long and hard all week about what to do. Cotton balls? Ordinary. Dryer lint? Flammable. Pom poms? What does one do with pom poms besides add some googly eyes? Not in the mood.

But then I found this: Pom Pom International!

Amy Lamé has a vision. She is trying to bring people of the world together. But how? With music? No. Art? No. What then? Pom poms!! What could be less politically charged and more fun and appealing to humans everywhere, than the humble pom pom! As Amy puts it:

Dealing with differences is much easier with a stress-busting pompom in your hand.

This is what it is all about:

Pom Pom International travels to areas of conflict around the globe. Together, we create whimsical,
non-political, creative balls of fluffy yarn in a gesture of peace and reconciliation. All pom poms are tagged, tracked and sewn together to make the biggest pom pom in the world.

Why not? I love this idea!! A peace pom pom!

If you can’t make it to a live pom pom making event, then you can create your pom pom at home and send it to Amy. Email her a photo of you and your pom pom and she’ll add it to her online gallery.

I remember my mother teaching me how to make pom poms and I have a distinct fondness for them, so I was quite excited to make pom poms for a higher purpose than merely a place to stick googly eyes.

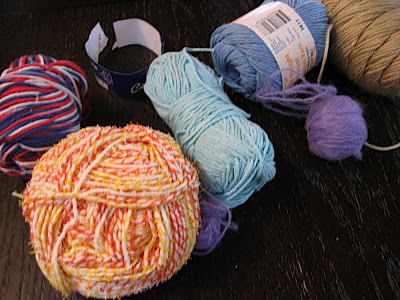
Pom poms are surprisingly easy and fun to make. All you need is some sturdy cardboard (corrugated is best) and leftover yarn:

Cut two matching circles out of the cardboard. Next cut matching circles out of the middle of the original circles so you have a doughnut shape. (NOTE: Our cardboard was from an extra heavy box so I ended up using a dremel tool to cut these, but you really don’t need cardboard that is quite that tough!):

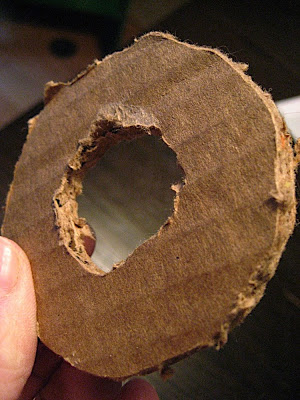
The width of the “ring” portion of your doughnut (distance between outer edge and start of inner hole) will determine the size of your pom pom (bigger band=bigger pom pom). Also, I would advise making your donuts a bit bigger than we did so that the middle hole can be bigger. A larger hole makes it easier to pass the yarn through.

Place your cardboard rings together like a sandwich.

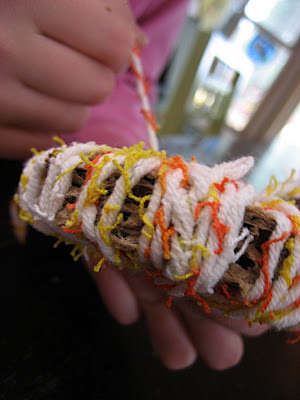
Choose your yarn and cut a length that is several yards/meters long. Roll it into a small ball so that it can easily pass through the center hole. Pass the loose end of the yarn through the hole and hold on to it with your thumb. Wrap yarn tightly around the doughnut like this (once you start wrapping, you can let go of the loose end):

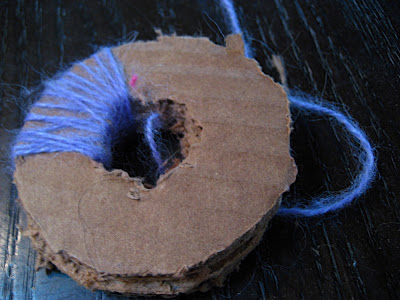
Keep wrapping all around the circle as many times as necessary to completely cover it. Keep going until you can no longer fit any yarn through the hole … or you run out of patience, whichever comes first! The more yarn you use, the thicker and puffier your pom pom will be.

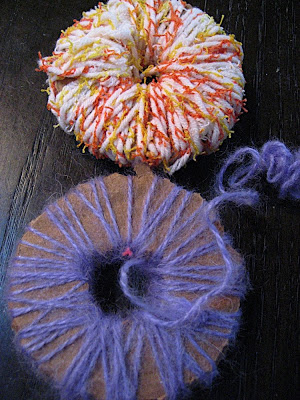
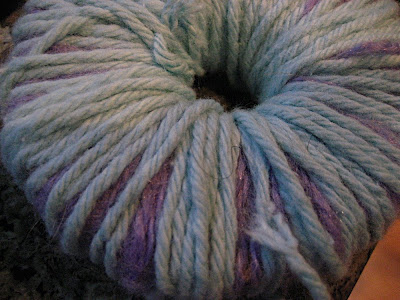
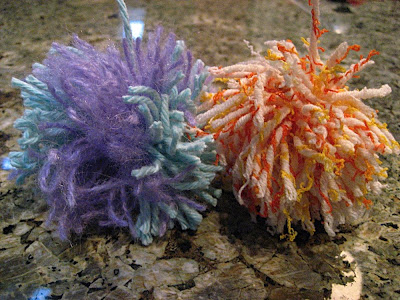
When you finish your first small ball, you can easily add on more yarn by simply threading the loose end through and holding it with your thumb, just as you did before. You can change colors this way too, as I did with my blue and purple pom pom.

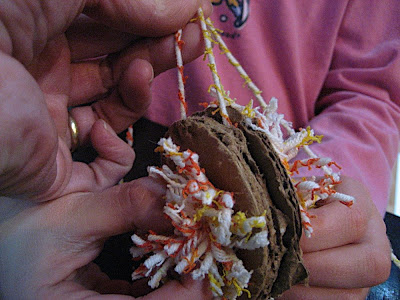
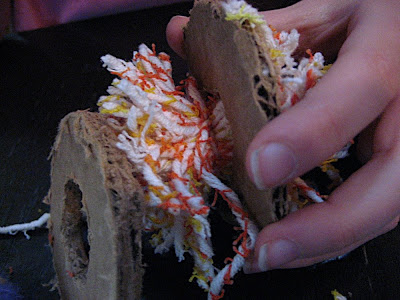
When you are through wrapping, cut the strands all the way around the edge of the doughnut with the scissor tips between the two cardboard pieces.

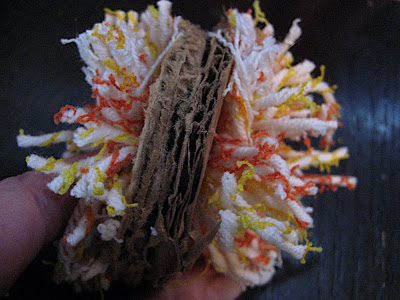
Now wrap a long strand of yarn around the pom pom, between the two sandwiched sections and tie tightly:

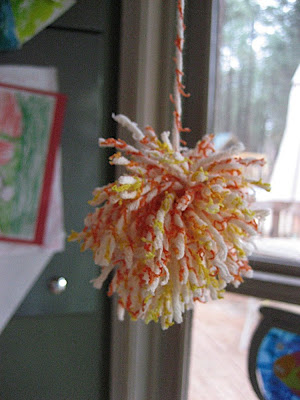
And finally, the really exciting part: gently pull apart the two cardboard rings to reveal your completed pom pom. Trim and fluff as necessary, and there you have it! A nice, fluffy, pom pom for peace!

In order to have your pom pom be a part of the giant peace pom pom simply print out a tag for each pom pom from the Pom Pom International website, take a photo of you and your creation for the website’s gallery (send it via email), then ship your tagged pom poms to Pom Pom International in London, England! Full instructions, tag and addresses are here.

Tomorrow after school we will be off to the post office to send our peace pom poms to England. The children are very excited!

++++++++

LINKS:

Amy’s explanation and diagram of making a pom pom - very helpful!

Pom Pom International

Pompoms Can Save the Planet - May 6, 2008, The Scotsman Newspaper

By the way, Amy also gratefully accepts donations of any leftover or recycled yarn balls and bits. Send all “orphaned or previously loved yarn” here:

NEW Pom Pom International HQ
106 Lower Marsh
London SE1 7AB
ENGLAND

It will be used for the free pom pom making events.

If you are feeling really enthusiastic, she also seeks Pom Pom International Ambassadors. Can you volunteer to organize a pom pom making booth at a crafts or art fair? How about a club event? The more pom poms, the better.

++++++++

Did you do a fluffy Unplugged Project this week? If so, then please post a link to your project post (not just your blog) in Mr. Linky below. If you didn’t participate but would like to learn more, then please do not link, but read about it here.

++++++++

The theme for next week’s Unplugged Project will be:

Curly

Have fun!

++++++++

Blog Widget by LinkWithin

Fight World Hunger

Panorama Theme by Themocracy